Measuring the Curvature of the Earth, in the Style of the Ancient Greeks
Contributed by George Hulsey
The flat earth movement is stronger than ever! Have you ever wanted to prove for yourself that we do, in fact, live on a globe, instead of a big disk? You’re in luck–you can do it with just a roll of paper towels and a Zoom call to a friend or relative! The story of the first man to this takes us back in time just a few thousand years.
Around the year 300 BC, there was a fellow named Eratosthenes who lived in the city of Alexandria, in northern Egypt. He heard that there was a town a ways south of Alexandria where something curious happened: sometime in June, at midday, the sun shone directly down to the bottom of a well, and cast no shadows. He noted that on the same day, at the same time, the sun in Alexandria cast shadows behind all the statues and obelisks of his fair city.
How could this be? Eratosthenes realized that if the sun cast different shadows at different places at the same time, on the same day, it must mean that the surface of the earth is curved! Beyond this, he measured the length of the shadow of a column cast on that particular day. He also paid someone to walk all the way from Alexandria to the small town with the well just to measure how far it was! Using only this information, Eratosthenes suggested that the Earth was a globe, with a circumference of 250,000 “stadia”, or stadium lengths. He measured distances in chariot stadium lengths just like we measure distances in football fields! While the exact size of a chariot stadium is not exactly known, Eratosthenes’ guess is likely about 24,000 to 29,000 miles. It turns out that the actual circumference of the Earth is 24,901 miles. Not too bad for an old fella in 200 BC!
The good news is that in this day and age, we don’t have to walk 5000 stadia to measure the distance between two places. So anyone can reproduce Eratosthenes’ calculation at home! With a little math, you don’t even need a well for the sun to shine directly down into. We’ll show you how to do it all!
Materials
- 1 cardboard tube from a used roll of paper towels
- A measuring tape or ruler
- A smartphone
- A relative or friend who lives a good deal north (or south) of you (different time zones are OK, but different hemispheres aren’t). It works best if they live almost directly north/south of you!
Procedure: Seeing the Curvature
- Call your friend or relative and convince them to do some science with you. Make sure they also have the materials!
- Choose a day and a specific time where you and your new “lab partner” can both do the experiment. The sun has to be out, and near midday is best!
- If your friend/relative lives in a different time zone, do the experiment at the same local time: i.e. at 12 pm EST and 12 pm PST, even though this means you don’t do the experiment at the same time as each other.
- On your chosen day and time, use your smartphone’s “Level” app to find a level surface. Then do the following:
- Measure and record the length of your paper towel tube.
- Set the paper towel tube upright on the surface.
- Measure and record the length of the shadow cast by the paper towel tube.
- Get your “lab partner” to take the same data, and send it to you!
- Divide the length of the tube by the length of the shadow, for both sets of measurements. If these two numbers are different, it means the Earth must be curved! If not, please contact NASA immediately.
- If you want to go farther and calculate the circumference of the Earth from your two sets of measurements, follow the next set of instructions.
Procedure: Measuring the Circumference!
The data you have should look like this:
| Location 1 | Location 2 |
| Tube height = h1 | Tube height = h2 |
| Shadow length = L1 | Shadow length = L2 |
There’s one more piece of data to get. Go to the following website: https://www.distancecalculator.net/. Put in the city where you made your measurement the city where the other measurement was made. Write down the distance D to the nearest mile.
Now we need to do some math. First, we are going to calculate the angle that the sun’s rays are making with the earth at each location. We can do this by using the inverse tangent function:

You can go to https://www.wolframalpha.com/ and type “arctan(h1/L1)” and substitute your measurements h1 and L1, then h1 and h2. You’re going to get two numbers, which you should express in radians, corresponding to the angle of the sun at locations 1 and 2, respectively. Then you should use the following formula for the circumference of the earth, based on your measurements!

Put in your angles θ1, θ2 which you calculated above, then put in the distance D that you looked up. The result, using the above formula, should give you a number that represents your measurement of the circumference of the earth!
The real circumference is 24,901 miles. Even if you got a number sorta close, but not exactly this, if it’s more than 20,000 or less than 30,000 you did pretty well!
Physics Concepts and Questions
- Prove to yourself that if a surface is flat, the sun will cast the same shadow for two objects which are the same height.
- Why would this not work if your partner lived on the other side of the equator from you?
Imagine if the sun was directly above the equator, and you lived as far north above the equator as your partner lived south of the equator. Then the sun will cast the same shadows, in different directions, on each of you! So if you used the above formula, it would tell you that the earth is flat.
- If you want to see how to find the formula given above, check out the images below. It’s just drawing clever triangles!

- First we draw a cross-section of the Earth. Each location is pictured, and so is the distance between them on the surface of the Earth. The angle θ is the angle between the two locations, as measured from the center of the Earth.
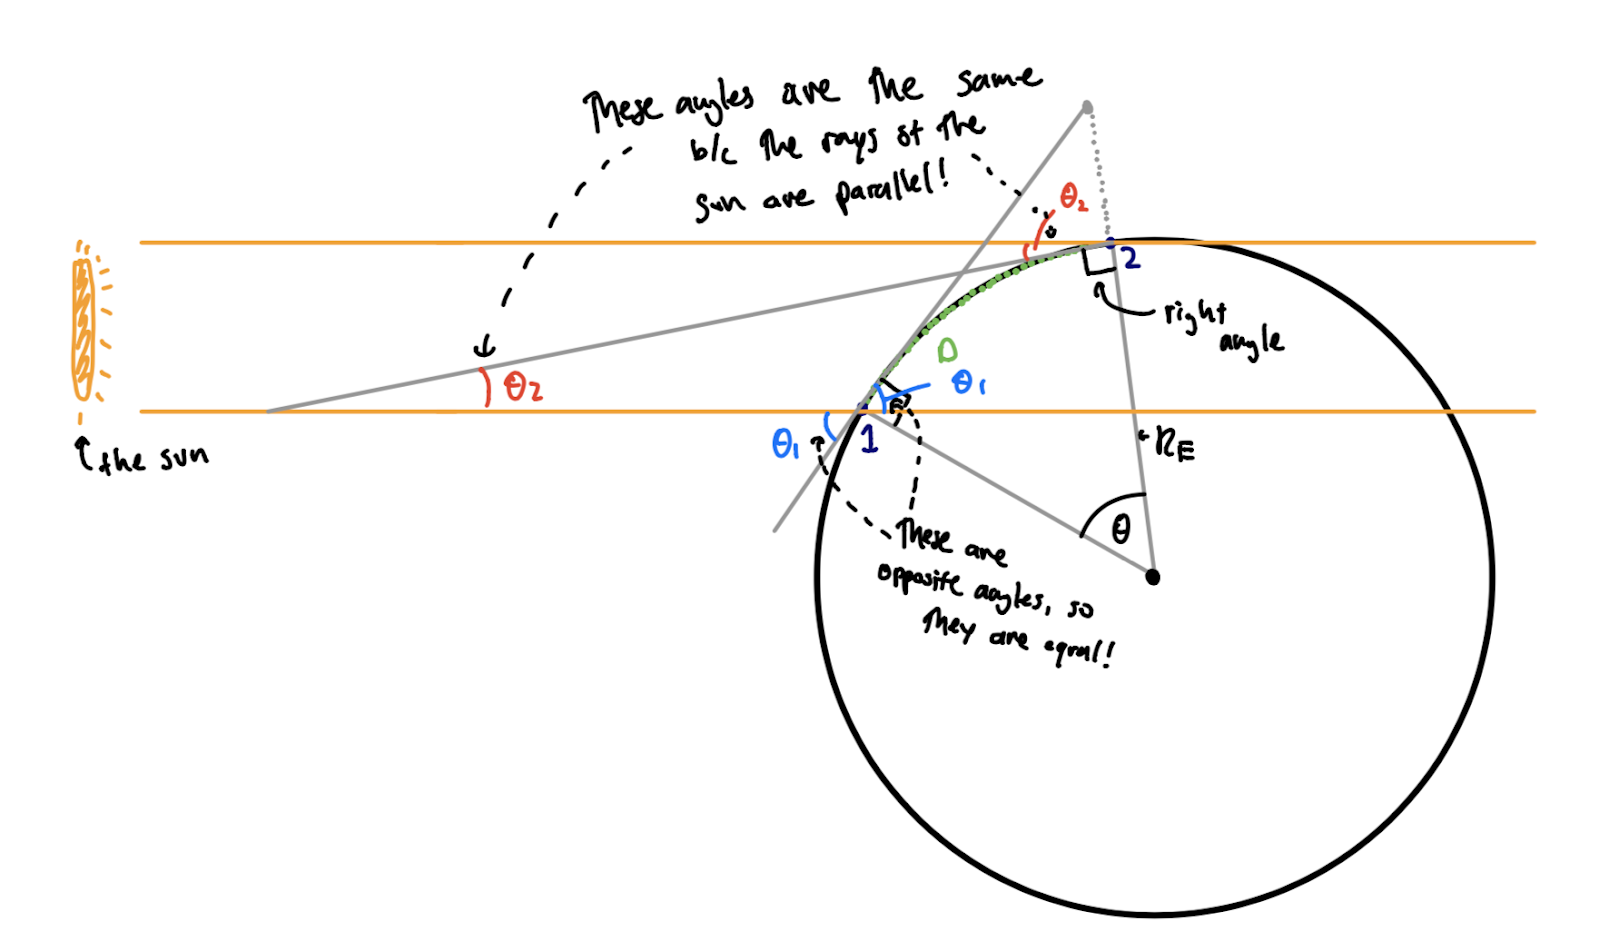
- Now we draw in the rays of the sun. We assume that they are parallel, since the sun is so far away. I also drew two gray lines which are “tangent” to the circle: the angle these lines make with the rays of the sun are the angles you measured, by measuring the height of the tube, the length of the shadow, and using the inverse tangent function.
- There are some important things to notice here: there are two right angles, shown by a square where the angle sits, and we can also figure out that two of the new angles that appear here are equal to ones that we already know! The reasons why are written in the drawing above.
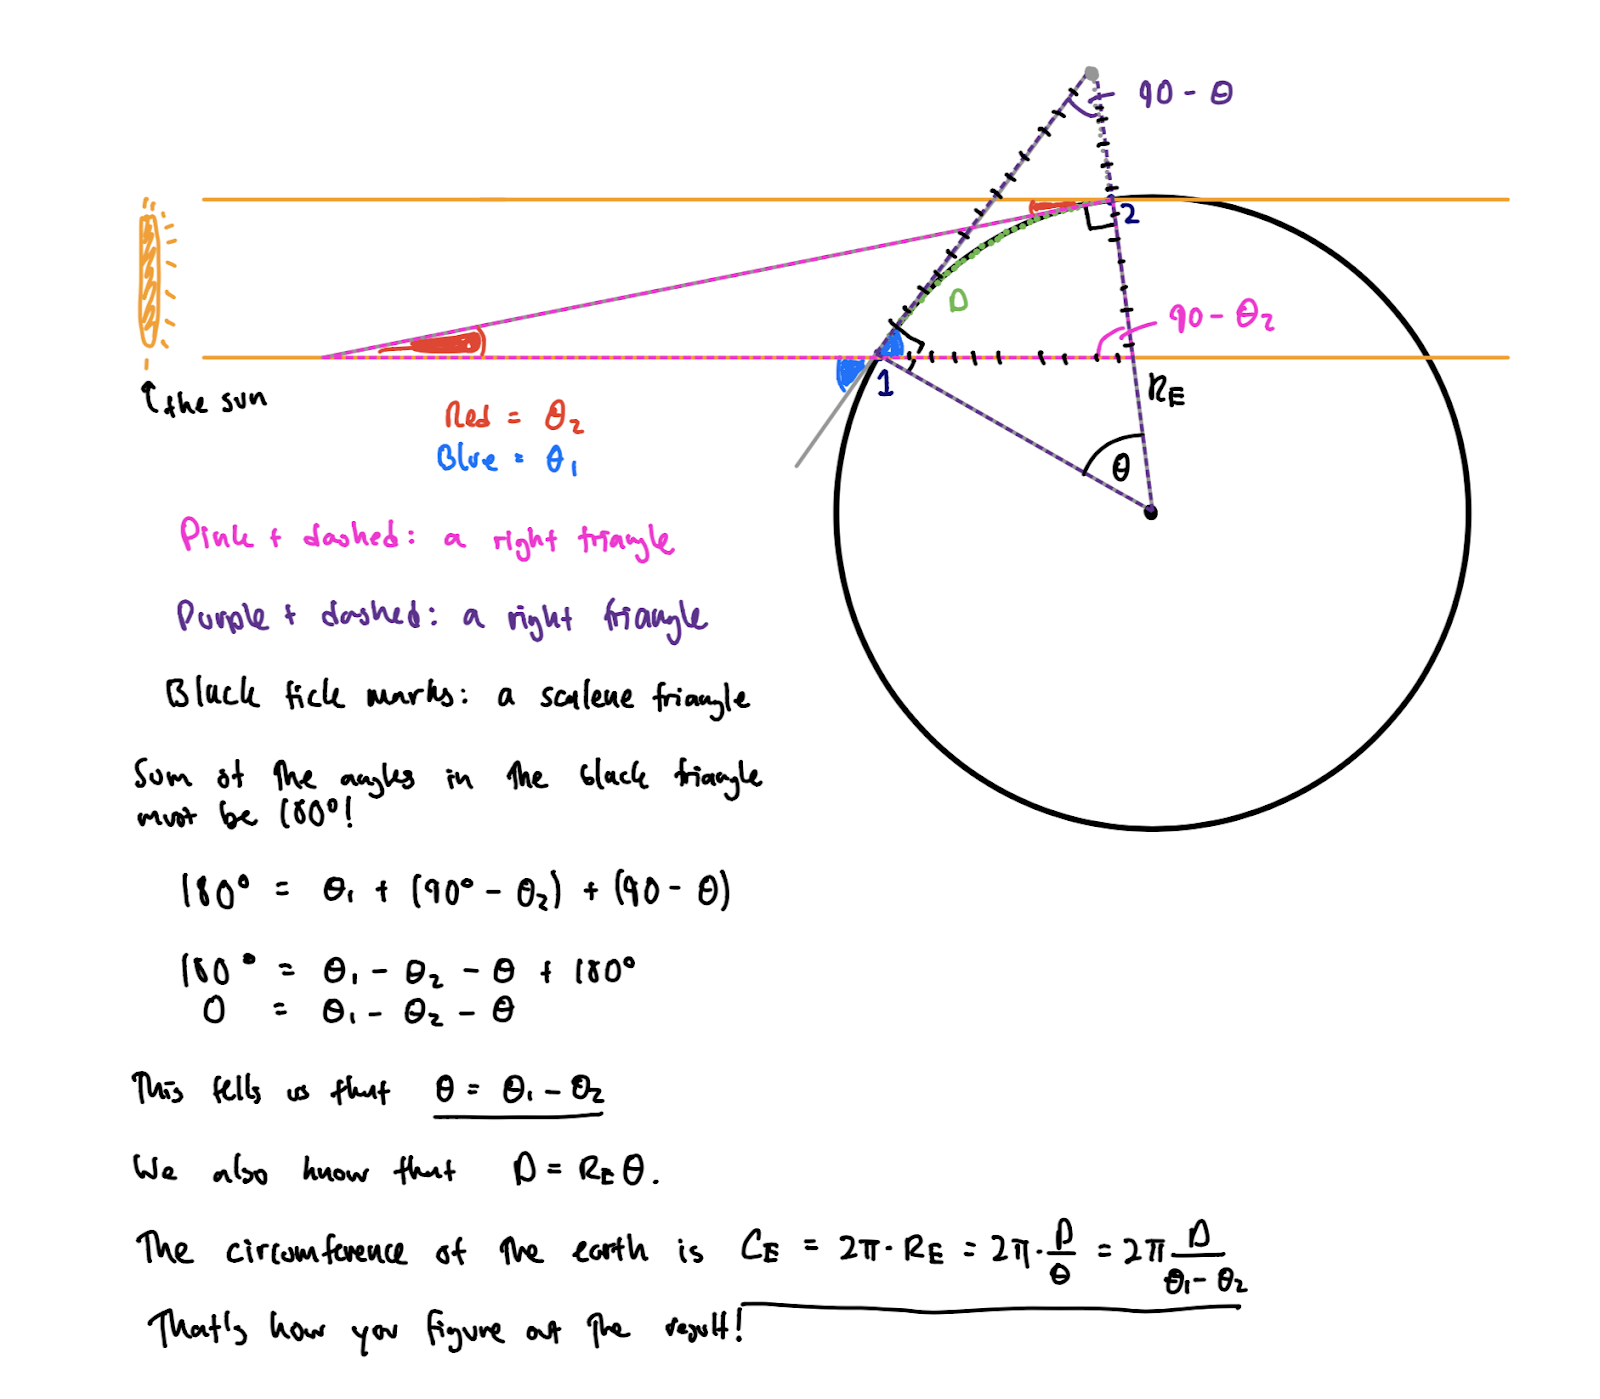
- Follow the notes in the drawing above. I highlighted three different triangles: one with a pink and dashed outline, one with a purple and dashed outline, and one with black tick marks on its outline. In each of these triangles, we know the angles have to add up to 180 degrees. So in the pink and purple ones, which are both right triangles, we already marked the “unknown” angles with the values they must have so that all the angles add up to 180!
Hopefully these pictures give you a sense of how to figure out the formula that I gave for yourself!
Citations
Recent Comments